Well, I haven't written anything on here for an insane amount of time, so here's a short hello.
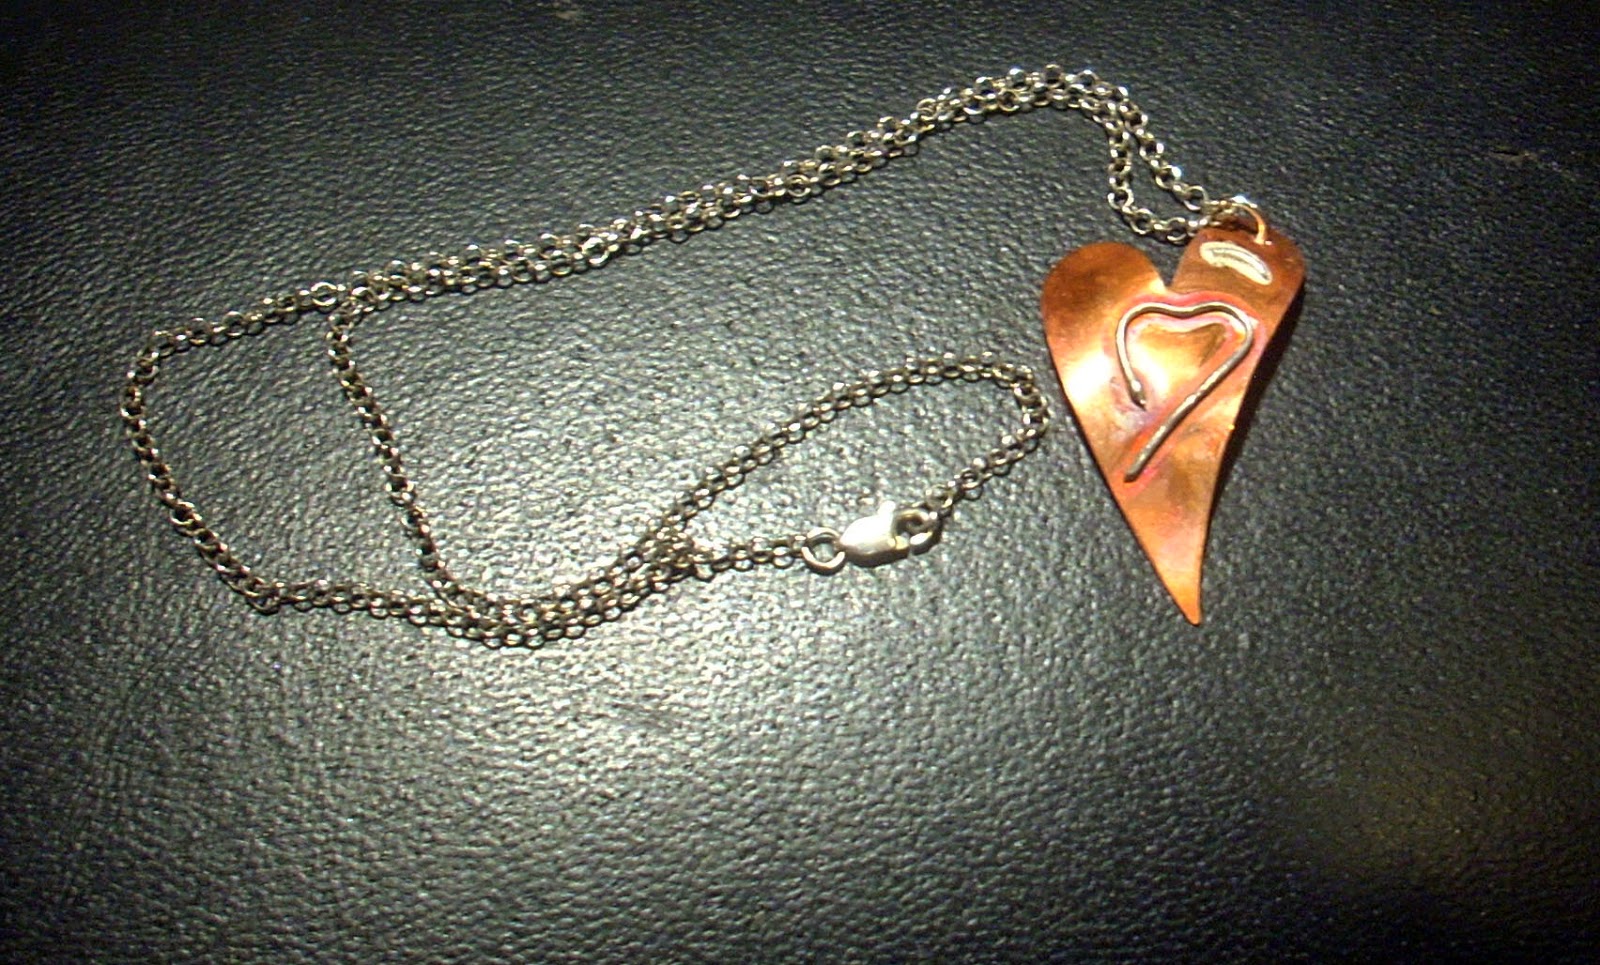
I've been doing a lot of stuff fusing silver to copper, making pendants. Having spent a lot of time making intricate beaded jewellery this technique is a really great antidote.
Recently I experimented with making a bowl. For the jewellery I use pre-cut shapes as they are really very well priced and I couldn't make them myself for the same amount, but for the bowl I needed to cut the shape by hand, this was easier than I thought, takes a little care as the blades are very fine and break easily.
I used a pair of long silver earrings bought from a second hand market, very 80s. It's very small bowl as I only have a little doming block to make the bowl in.
Here it is, not completely finished in these pictures, needed a little more polishing.
Not too bad for a first attempt I thought.
Welcome
Welcome to my blog, random stuff about me and where I live, plus some bits about my jewellery.
Ley Holloway is a participant in the Amazon EU Associates Programme, an affiliate advertising programme designed to provide a means for sites to earn advertising fees by advertising and linking to Amazon.co.uk
Wednesday, 24 October 2018
Wednesday, 1 March 2017
Finished Moonlit Water pendant
I've been working on a little piece which I've called either Moon Water or Moonlit Water, although I think I might have used the second version for a much earlier piece.
The piece uses white sea glass and silvery and white beads, both vintage and modern. I frequently use silver wire torcs to hang these pendants but I decided that this time I would make a beaded necklace.
(For people who think I've misspelled torc, that's the right spelling, torque has something to do with engines, sorry bit of a pet hate of mine)
This is very unusual for me, I actually drew a design for this piece, it's even turned out not too far from this!
Here's a very early stage of the piece, fixing the sea glass to a backing with rows of hand stitched beads.
This is the pendant finished, slightly out of focus sadly.
I've recently started using metals, fusing them together. So I decided to make a fastener for this piece out of silver wire.
The clasp is a T Bar style with a loop which the T bar fits through. It's made by twisting wire round itself and then fusing it with a blow torch. This wire was quite fine so I had to be careful not to just melt it. After cleaning the fused wire is hammered flat, this makes it much harder, work hardened.
In the top image you can see the mini anvil I use to hammer the shapes with a small modellers hammer.
Here's the finished piece on my work mat. I've added some embellishments to the simple beaded necklace, partly because it felt like it needed something, and also so that the pendant will sit with it's clasp visible at the side rather than at the back as usual. After all if it's such a nice fastener why hide it?
There are a some tiny baroque pearls in this piece which I found on an antique/junk stall, it's a great multi strand necklace so lots of pearls available.
Friday, 10 February 2017
Update on the jewellery front.
I've been shamefully neglecting this blog recently, so here's a general catch up on what I've been up to with my jewellery and stuff.
I still haven't finished the big sea inspired piece with the lace, it's a lot further on but still not finished.
I've been playing with copper and silver recently, fusing the silver onto copper shapes with a blow torch.
All of these will be in my Folksy shop if you're interested, a couple already are, follow the links.
This stuff is huge fun to make but very unpredictable. It involves blasting the silver with a blow torch until it looks shiny and starts to run. You have to take it through that cherry red stage and out the other side. The trick is to catch it just at that point where it still looks like a piece of silver rather than a puddle, but melts enough to fuse to the copper. I'm getting better at it but it still plays up sometimes.
The third one down is interesting because it's using a failed silver clay piece. I made some moulds from very fragile shells and tried to recreate them in silver clay, all but one broke when I tried to polish them so I tried using one of the failures this way, very pleased that it worked.
I buy the copper shapes, they are incredibly cheap so why bother making them?
Fine, or pure silver works more easily but it's more inclined to disappear into a puddle too.
Most of this year has been taken up with decorating, or rather renovating, my living room. More about that in another post perhaps.
I still haven't finished the big sea inspired piece with the lace, it's a lot further on but still not finished.
This is the stage it's at now, I may have to adjust the lace a little in order for the piece to hang correctly when worn. We'll see when the other half of the actual necklace is made
I've been playing with copper and silver recently, fusing the silver onto copper shapes with a blow torch.


All of these will be in my Folksy shop if you're interested, a couple already are, follow the links.
This stuff is huge fun to make but very unpredictable. It involves blasting the silver with a blow torch until it looks shiny and starts to run. You have to take it through that cherry red stage and out the other side. The trick is to catch it just at that point where it still looks like a piece of silver rather than a puddle, but melts enough to fuse to the copper. I'm getting better at it but it still plays up sometimes.
The third one down is interesting because it's using a failed silver clay piece. I made some moulds from very fragile shells and tried to recreate them in silver clay, all but one broke when I tried to polish them so I tried using one of the failures this way, very pleased that it worked.
I buy the copper shapes, they are incredibly cheap so why bother making them?
Fine, or pure silver works more easily but it's more inclined to disappear into a puddle too.
Most of this year has been taken up with decorating, or rather renovating, my living room. More about that in another post perhaps.
Wednesday, 1 July 2015
Revisiting a piece of jewellery started ages ago
I believe I may have written about my plans for a blue and white ceramic piece quite some time ago. I've recently started working on it again and have got to the stage of attaching some vintage lace to one side of it.
This is the stage it got to before being put aside for months, I've taken it much further now, it's not been planned on paper, as most of my stuff isn't, but there's a definite image in my head of what I want it to be.
Here it is with all the beading finished, the problem with these 'plate' pieces is the amount of time it takes to attach the beads so that none of the backing shows anywhere. You can tell that it's been sitting around for a while in the first picture, as something has stained the backing! Not sure what but luckily it gets totally hidden in the finished piece.
In this picture you can see the edge row, this hides the join between the original backing and the leather which covers it and hides the tangled spiders web of stitches that hold all those beads in place. The lace behind it was my first idea for what to use I've sinced added another layer of different lace to go under it.
the underlayer of lace is attached to one edge of the piece, the other piece of lace will go on top and the two will be gathered and ruched and beaded within an inch of their lives. I want an effect of surf, or at least a suggestion of that, the ceramic pieces and the beads are the waves you see. I know what I mean anyway.
Here is where it is at now. Totally ungramatical sentence I know but I'm tired and it says what I mean sort of. Hopefully you can see the beginnings of the ruching. The two pieces are joined along the long edges of the top piece, both are attached to the ceramic 'plate'. Eventually there will be bead weaving extending from the end of the lower lace piece to form one side of a necklace. The other side will be all beading, but I expect I'll throw some wierdness in there, holes and twists, that sort of thing.
As an after thought I recently altered a piece I made a few years ago, which I was never happy with, I realised that it didn't hang right because it was too long. Now any one who does bead weaving will know how hard it is to take it apart, especially if you only want to take a little bit apart and leave the rest intact, well I finally got the time and the nerve to tackle it and I'm much happier with it now.
The bottom picture show my much younger neighbour modelling the original, the other two are me showing it shortened, it looks much better on Caz but I still think it looks better shorter.
another 'plate' piece, I call it River.
This is the stage it got to before being put aside for months, I've taken it much further now, it's not been planned on paper, as most of my stuff isn't, but there's a definite image in my head of what I want it to be.
Here it is with all the beading finished, the problem with these 'plate' pieces is the amount of time it takes to attach the beads so that none of the backing shows anywhere. You can tell that it's been sitting around for a while in the first picture, as something has stained the backing! Not sure what but luckily it gets totally hidden in the finished piece.
In this picture you can see the edge row, this hides the join between the original backing and the leather which covers it and hides the tangled spiders web of stitches that hold all those beads in place. The lace behind it was my first idea for what to use I've sinced added another layer of different lace to go under it.
the underlayer of lace is attached to one edge of the piece, the other piece of lace will go on top and the two will be gathered and ruched and beaded within an inch of their lives. I want an effect of surf, or at least a suggestion of that, the ceramic pieces and the beads are the waves you see. I know what I mean anyway.
Here is where it is at now. Totally ungramatical sentence I know but I'm tired and it says what I mean sort of. Hopefully you can see the beginnings of the ruching. The two pieces are joined along the long edges of the top piece, both are attached to the ceramic 'plate'. Eventually there will be bead weaving extending from the end of the lower lace piece to form one side of a necklace. The other side will be all beading, but I expect I'll throw some wierdness in there, holes and twists, that sort of thing.
Watch this space.
As an after thought I recently altered a piece I made a few years ago, which I was never happy with, I realised that it didn't hang right because it was too long. Now any one who does bead weaving will know how hard it is to take it apart, especially if you only want to take a little bit apart and leave the rest intact, well I finally got the time and the nerve to tackle it and I'm much happier with it now.
The bottom picture show my much younger neighbour modelling the original, the other two are me showing it shortened, it looks much better on Caz but I still think it looks better shorter.
another 'plate' piece, I call it River.
Sunday, 3 May 2015
A new adventure
It's been a while since I've done anything here. Lots happening in my life, after finally passing my driving test in January I now own a little car. It's a Citroen Saxo and although it's quite old it runs ok. Lots of people told me that after you pass your test is when you learn to drive, they were absolutely right. I'm getting used to not having power steering, hard work, but it's good exercise for my arms!
Well, since picking the car up on Wednesday 28th I've driven home from Barnstaple and back in again twice, have shopped in Tesco and driven down to Ilfracombe. I have a couple of people to thank for this new found freedom. First of all my incredibly patient instructor, Paul Troke. If anyone in North Devon is thinking of learnng I can thoroughly recommend Paul. Secondly my very kind neighbour Ross who came to look at cars with me, I know nothing about them, certainly not enough to choose one to buy, he also helped me park it properly the first time I brought it home, had trouble reversing up hill.
Today was a big one I drove all the way to Parracombe for lunch at the Fox and Goose. Lunch was delicious, I took my friend Mike up on his offer to park the car for me, got to get better at that. Thanks to Fran for organising the lunch. I then drove in to Lynton to visit the Art and Craft Centre for some gardeners soap. I bought a bar a couple of years ago and it's down to a tiny sliver. Unfortunately the people who make it haven't put their name on the packaging so can't tell you who they are.
I'm taking part in the first Ilfracombe Art Trail next weekend. My little house will be open from 10.00 - 5.00 on Saturday 9th and Sunday 10th May.
I've just completed a piece that's been waiting for me to finish it for ages. Really quite pleased with it, I bought the sari silk strips recently and it seemed the ideal thing to make the support for this pendant.
Labels:
art,
Art Trail Ilfracombe,
aventurine,
car,
driving,
jewellery,
lunch,
Lynton,
Parracombe,
pendant.,
sari silk
Sunday, 8 February 2015
Just a bit of a rambling catch up and new jewellery.
It's been a while since I wrote anything on here. Lots happened recently, first of all, and most exciting, I passed my driving test, took 2 and a half years and three attempts. Many thanks to my instructor, of infinite patience, Paul Troke
All I need to do now is buy a car! That could take a while.
Secondly I took on the role of chair for the conservation group I belong to, only because we have to have one and everyone else was avoiding the question!

So far nothing too scary, just signing forms and supposedly chairing a meeting.
Few bits of jewellery I've made recently:
This needs finishing a bit. silver wire melted onto copper heart.
Open Heart, simple silver and copper pendant.
This is a brooch I was commissioned to make for a friend. sea glass in the centre, czech glass flowers around it and a row of flourite beads with my usual vintage and modern seed beads. The pin is silver wire.
This is a new style of work, I had this idea running around my head for a while and I made it up as another suggestion for my frend's commission. Just silver wire wrapped around an Aventurine bead. The bead measures about 3/4" (2cm) long.
Sunday, 16 November 2014
Magic 'Diamonds' from my metal cleaning solution.
I've been using cream of tarta,r in place of more usual solutions, to clean fire stain from my pieces after heating. Recently it's been much harder to buy in sensible quantities, I bought some from a local healthfood and baking supplies shop and it was obviously much better quality than I've bought before, I may have been buying the substitute version, or an adulturated version, previously as something has happened which never happened before.
These amazing crystals grew in the pot, I had made a solution a few days ago, maybe as much as a week, and wanted to use it again today, I stirred it with my finger to get the sludge off the bottom and found what appeared to be a piece of glass in there. Puzzled I pulled it out and found the largest crystal you can see on the left above.
At first I thought, broken glass, but I haven't broken anything recently and I live alone apart from the cat. Further investigation produced all these beautiful crystals.
Sadly they will react with moisture and dissolve again eventually otherwise you can bet I'd find a way to make jewellery from them!
Apparently they will carry an electric charge and there's all sorts of stuff on the net about how to use them, none of the crystals I've seen there are as big or as beautiful, I did add lemon juice to make the solution a tad more acid, maybe that makes the difference?
I shall just admire them for now until they disappear.
Just beautiful
I'd appreciate any knowledgeable person giving me some more info about these beauties.
Meanwhile here's some of the work that I've made that needed to be cleaned
These amazing crystals grew in the pot, I had made a solution a few days ago, maybe as much as a week, and wanted to use it again today, I stirred it with my finger to get the sludge off the bottom and found what appeared to be a piece of glass in there. Puzzled I pulled it out and found the largest crystal you can see on the left above.
At first I thought, broken glass, but I haven't broken anything recently and I live alone apart from the cat. Further investigation produced all these beautiful crystals.
Sadly they will react with moisture and dissolve again eventually otherwise you can bet I'd find a way to make jewellery from them!
Apparently they will carry an electric charge and there's all sorts of stuff on the net about how to use them, none of the crystals I've seen there are as big or as beautiful, I did add lemon juice to make the solution a tad more acid, maybe that makes the difference?
I shall just admire them for now until they disappear.
I'd appreciate any knowledgeable person giving me some more info about these beauties.
Meanwhile here's some of the work that I've made that needed to be cleaned
This is a bit of an experiment, I bought these copper stars and up to now I've made pendants just using one, I wanted to see if I could make something more complex, there's a bit of an industrial feel with the copper wire, because the silver is applied by melting with a blow torch the results are unpredictable so the earrings are not an exact match. I quite like that, hopefully others will too.
I call this one Planet, it has a sort of Jupitery, Saturny feel to it. There are actually two stripes of silver wire but the top one was thinner and almost melted completely.
These random effects are really lovely in my opinion. This one is domed slightly to give a more substantial feel to the piece. The chain is a recycled silver trace chain, bought from a collectors market with a fairly naff pendant on it which I discarded.
There are two new pieces soaking in the magic cream of tartar solution now, a heart and another disc.
Sunday, 24 August 2014
Finally getting round to this one, copper and silver star set.
I have had these 5 brass and copper stars around for quite a while, I fused the silver onto them with the intention of making a necklace and earrings. Several months ago to be honest.
As you can see I've finally linked three of them to start the necklace.
The reason for leaving it so long was the fear of drilling holes in those narrow points!
I have done it before, but only one hole, I don't have a drill stand, just a little cheap modelling tool.
Without a stand to lower the drill precisely down onto the piece the sliding around is really hard to control, I found that making a small dent in the surface with a tack (I'm sure there are more professional ways to do that) helped, I developed a technique starting with the drill in the dent and switched off, then turned to it's slowest setting and gradually turning up the speed.
You need three hands really, I taped the pieces to the wood with masking tape and held the wood still with my right hand, I had to use part of that hand to steady the drill too its a complicated manoeuvre. I actually had the wood on the heating block you can see on the table, (bit of a staged shot that, drill not switched on and a hole already drilled).
So right wrist braced against the edge of the block, thumb and 3rd and 4th fingers holding the wood, 1st and 2nd fingers against the side of the drill near the chuck, left hand holds and operates the drill at the same time, phew what a way to work. Don't recommend it but worked for me.
Well eventually got all the holes drilled, the wire linking them is copper wire twisted and then fused, again a tricky job as I didn't want to heat the stars or melt the untwisted wire loops through the holes, I use this stuff to try to prevent that:
Its a thick paste which coats where you don't want the heat. Not 100% but pretty good.
Here are the earrings, not an exact match of course, not possible with this technique, you can see the raw copper wire before melting/fusing. On the right you can see how well the paste has preserved the star while I was fusing the wire link. You can also see where the drill has made a total mess of the bottom point of the left hand star, will have to see what I can do with that.
Heating the copper to melt and fuse the twists, you can just make out the grey blob of Technoflux paste to the left of the flame, unfortunately I foolishly forgot the loop at the other end, it's burnt through so I shall have to redo this bit! My excuse is that I was getting rather tired, it was after 7pm and I'd been at it for a couple of hours or more.
Well there you go I will have to look into getting a little drill stand sometime, if there's one that will fit my little drill. (It came from Lidl in case anyone wonders, very cheap and very reliable, my more expensive cordless one doesn't have variable speed! Amazing shop, keep an eye out they're bound to have them again sometime)
I'll post again when the set is finished.
That's a very old laminated table top. had a lot of stuff thrown at it over the years.
As you can see I've finally linked three of them to start the necklace.
The reason for leaving it so long was the fear of drilling holes in those narrow points!
I have done it before, but only one hole, I don't have a drill stand, just a little cheap modelling tool.
Here it is in action.
Without a stand to lower the drill precisely down onto the piece the sliding around is really hard to control, I found that making a small dent in the surface with a tack (I'm sure there are more professional ways to do that) helped, I developed a technique starting with the drill in the dent and switched off, then turned to it's slowest setting and gradually turning up the speed.
You need three hands really, I taped the pieces to the wood with masking tape and held the wood still with my right hand, I had to use part of that hand to steady the drill too its a complicated manoeuvre. I actually had the wood on the heating block you can see on the table, (bit of a staged shot that, drill not switched on and a hole already drilled).
So right wrist braced against the edge of the block, thumb and 3rd and 4th fingers holding the wood, 1st and 2nd fingers against the side of the drill near the chuck, left hand holds and operates the drill at the same time, phew what a way to work. Don't recommend it but worked for me.
Well eventually got all the holes drilled, the wire linking them is copper wire twisted and then fused, again a tricky job as I didn't want to heat the stars or melt the untwisted wire loops through the holes, I use this stuff to try to prevent that:
Its a thick paste which coats where you don't want the heat. Not 100% but pretty good.
Here are the earrings, not an exact match of course, not possible with this technique, you can see the raw copper wire before melting/fusing. On the right you can see how well the paste has preserved the star while I was fusing the wire link. You can also see where the drill has made a total mess of the bottom point of the left hand star, will have to see what I can do with that.
Heating the copper to melt and fuse the twists, you can just make out the grey blob of Technoflux paste to the left of the flame, unfortunately I foolishly forgot the loop at the other end, it's burnt through so I shall have to redo this bit! My excuse is that I was getting rather tired, it was after 7pm and I'd been at it for a couple of hours or more.
Well there you go I will have to look into getting a little drill stand sometime, if there's one that will fit my little drill. (It came from Lidl in case anyone wonders, very cheap and very reliable, my more expensive cordless one doesn't have variable speed! Amazing shop, keep an eye out they're bound to have them again sometime)
I'll post again when the set is finished.
Monday, 18 August 2014
Fusing Metal Experiments
I've been making stuff by fusing metal together without solder, some of it quite simple, just a copper shape with some silver wire melted onto the surface. Yesterday I tried creating a 'cage' of wire for a piece of sea glass.
This is the result.
You might be able to see in the lower picture that a small section of the glass has become clear and shiny, as it would originally have been before it's time in the sea. I'm slightly amazed that a blowtorch could produce enough heat to apparently melt the surface of the glass. A friend tells me this is probably quite impure glass if it did that. The fusing is more obvious in this image too.
This is quite a nice technique, it works most easily with pure silver wire. You can create jump rings this way but it's tricky to do as part of an existing piece of jewellery, because of the chance of fusing other parts of the piece.
The basis of the technique is to play a blowtorch flame over a piece of silver wire that has been formed in such a way that two or more sections of the wire either touch or cross each other.
You need to use the end of the inner paler blue cone of the flame. This is the hottest part of the flame:
My technique, very technical, is to play the torch onto the piece until it gives in and melts. To begin with it should glow bright red and at the melting point it will become shiny and slightly shimmery, let it stay like that for a second or two and then remove the flame. Watch carefully, if you don't want it to run over a surface (as in the pieces below) keep a close eye on it. With luck, and practice, the wire will be fused.
Most of what I've done up to now has been these sorts of things, using pre-cut metal blanks in copper and brass:
The star has an old bone counter behind it, held in place with a copper wire loop.
This technique works with sterling silver too, it's not so easy as the melting point is slightly higher. The wire cage at the beginning of the blog is made using eco silver - recycled silver wire, it doesn't say sterling but I guess most silver scrap will be sterling.
I love this technique, it's very unpredictability is it's attraction for me. Have fun playing but be careful with blow torches they are not toys! Use a soldering or charcoal block to heat your work on, and keep flamable items clear obviously.
As a last tip, I use a mixture of cream of tartar, water and lemon juice to clean the firescale off the pieces, leave them covered in a solution the thickness of single cream overnight and voila! Of course pure silver doesn't tarnish but if you're fusing to copper it will go black.
Wednesday, 2 July 2014
A sort of round-up
I'm really bad at writing this blog so this is a quick round-up of the last couple of weeks, which have been really busy one way or another.
Remember the shed?
Sunday I took a bus to Okehampton to meet my sister and her husband who'd invited me to share their rented cottage in Mary Tavy for a week. Had a lovely relaxing week with great weather while my daughter fed the cat and got on with some work and took advantage of the peace and quiet of Devon, she lives in Hackney so a huge contrast.
Visited a gorgeous place called The Garden House , a beautiful, relatively small garden near Buckland Monachorum wonderfully clever design that makes a smallish area seem huge, with lots of different areas to look at and a new arboretum. the arboretum is still tiny saplings with protective fencing round them but will be great in a few years.
Lovely place, pity we got invaded by a noisy school group in the afternoon, but they weren't there long.
Next stop Cotehele, a lovely Tudor Manor house, National Trust. More lovely gardens and some white doves who kindly posed for us on the dovecot.
Went down to Cotehele Quay for lunch, very picturesque and lots of nice information about the history
Very nice week altogether, my sister and I visited some stone rows and hut circles up on the moor, nicely misty and mysterious weather.

For some reason blogger can't put the photos side by side!
Meanwhile back in north Devon my lovely neighbour is putting my shed up, with a little help from my daughter, many thanks to both, I did pay him, but much less than he could have asked for.
Here's the shed...........
Weatherproof and everything! It now has a proper door fastener, the one that came with it looked like it was made for a dolls house, you can probably just see it in the photo.
My daughter and I had another day together on the Saturday, didn't do much had a mooch about on the ebach, wandered into a few shops and had fish and chips before heading home. She had a seat on the very early coach on Sunday morning, so I walked down with her and saw her off then had an early mornng walk on the beach and found these two great pieces of glass.
I have plans for a double heart necklace, possibly even made so they can be worn together or separately, we'll see.
Well that's my last week and a half, gradually getting everything back into the new shed, but if anyone wants three rather rusty mountain bikes.......... oh and a spare strimmer.
Remember the shed?
Well, hooray, the new one arrived on Friday 20th of last month,
big heap of wood in the front garden, tidy heap, but still a heap.
Later that night my daughter arrived for a stay,
we spent Saturday together and went to a hilarious show
that was part of the Theatre festival in Barnstaple:
WOMANz
Tessa Waters
If you get the chance to see this fabulously funny, and rude, show, go, definitely go. Haven't laughed so much in ages.
Sunday I took a bus to Okehampton to meet my sister and her husband who'd invited me to share their rented cottage in Mary Tavy for a week. Had a lovely relaxing week with great weather while my daughter fed the cat and got on with some work and took advantage of the peace and quiet of Devon, she lives in Hackney so a huge contrast.
Visited a gorgeous place called The Garden House , a beautiful, relatively small garden near Buckland Monachorum wonderfully clever design that makes a smallish area seem huge, with lots of different areas to look at and a new arboretum. the arboretum is still tiny saplings with protective fencing round them but will be great in a few years.
Part of the wildflower meadow, there's a view towards Buckland Abbey at the end of this.
Took loads of pictures, but don't want to bore you all to death!
My sister and her husband, pity he was looking at his camera!
We also spent a day in Bellever Forest, a very nice part of Dartmoor with a river and some useful trees for shade, very hot weather!
Lovely place, pity we got invaded by a noisy school group in the afternoon, but they weren't there long.
Next stop Cotehele, a lovely Tudor Manor house, National Trust. More lovely gardens and some white doves who kindly posed for us on the dovecot.
Went down to Cotehele Quay for lunch, very picturesque and lots of nice information about the history
Very nice week altogether, my sister and I visited some stone rows and hut circles up on the moor, nicely misty and mysterious weather.
For some reason blogger can't put the photos side by side!
Meanwhile back in north Devon my lovely neighbour is putting my shed up, with a little help from my daughter, many thanks to both, I did pay him, but much less than he could have asked for.
Here's the shed...........
Weatherproof and everything! It now has a proper door fastener, the one that came with it looked like it was made for a dolls house, you can probably just see it in the photo.
My daughter and I had another day together on the Saturday, didn't do much had a mooch about on the ebach, wandered into a few shops and had fish and chips before heading home. She had a seat on the very early coach on Sunday morning, so I walked down with her and saw her off then had an early mornng walk on the beach and found these two great pieces of glass.
I have plans for a double heart necklace, possibly even made so they can be worn together or separately, we'll see.
Well that's my last week and a half, gradually getting everything back into the new shed, but if anyone wants three rather rusty mountain bikes.......... oh and a spare strimmer.
Subscribe to:
Posts (Atom)
Ley Holloway's Fan Box
Ley Holloway on Facebook